Back to InventoryDirect Main Menu
Automatic Routing
Location based approval routing automatically routes an inventory request based on the assigned Location. Most commonly, it may go to a Site Administrator (department head, administrative assistant, etc.) for approval and then, once approved, sent to the inventory administrator for processing.
Commodity based approval routing is frequently used for high ticket items needing extra approval, such as tools or expensive consumable items. For example, you may need to route requests for a floor buffer through the head custodian before issuing the tool to the user. The system will route the request based on the selection made in the Primary Commodity for Request Routing field on the Inventory item.
You may not need to enter any routing rules if your organization does not have a multi-person approval process. If all inventory requests should be routed to one person, such as the warehouse supervisor or logistics manager, simply select that user as the Comptroller for the account (under their user profile information) and all requests will be sent to them automatically.
How to Set Up Location Based Approval Routing
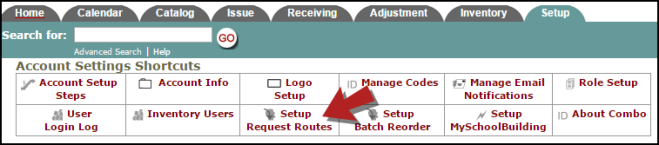
- Click on the Account Setup tab.
- Click on Setup Request Routes in the Shortcuts menu.
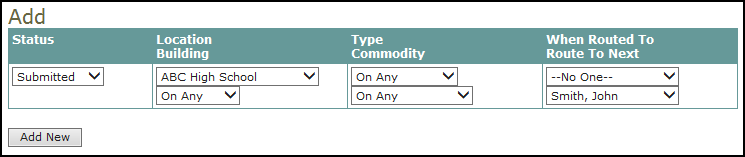
- Under the Add section, select the Status for the route. *Note: Select Submitted as the status for the first step in any approval route.
- Choose the name of the Location in the Location drop down box.
- Under When Routed To, leave the top drop down box as "No One". In the bottom Route to Next box, choose the name of the person responsible for the approval of the inventory request for this Location.
- Click the Add New button to save. This route now moves up to the list of routes at the top of the page. *Note: In the example pictured below, this route instructs the system: Any time a new inventory request is submitted for ABC High School, send the work order directly to John Smith for approval.
- Go back to the empty route in the Add section and select Approved in the Status box.
- Select the location again in the Location drop down box.
- Under When Routed To, select the name of the first person in the approval process in the top box. In the bottom Route to Next box, choose the name of the person whom the inventory request should be sent to after the first approval.
- Click the Add New button to save. *Note: In the example pictured below, this route instructs the system: Once an inventory request for ABC High School has been approved by John Smith, send it to Jane Doe.

How to Set Up Commodity Based Routing
- Click on the Account Setup tab.
- Click on Setup Request Routes in the Shortcuts menu.
- Under the Add section, select the Status for the route. *Note: Select Submitted as the status for the first step in any approval route.
- Choose the primary commodity from the Commodity drop down box. *Note: In order for Commodity based routing to work correctly, you must select a commodity for the Primary Commodity for Request Routing on the Inventory item page. This is the commodity you will select for the route.
- Under When Routed To, leave the top drop down box as "No One". In the bottom Route to Next box, choose the name of the person responsible for the approval of the inventory request for this commodity.
- Click the Add New button to save. This route now moves up to the list of routes at the top of the page.
-
Go back to the empty route in the Add section and select Approved in the Status box.
- Select the commodity again in the Commodity drop down box.
- Under When Routed To, select the name of the first person in the approval process in the top box. In the bottom Route to Next box, choose the name of the person to whom the inventory request should be sent after the first approval.
- Click the Add New button to save. *Note: In the example pictured below, this route instructs the system: Any time an inventory request is submitted for an item with the primary commodity of Extra Approval Needed, the request will go to Charlie Anywhere for approval before being sent to Jane Doe for processing.

How to Edit or Delete Routes
- To edit a route, click the Edit button next to the route you would like to change.
- The route will move to the Edit section below the route list. Use the drop downs to make your changes.
- Click Save to update the route.
- To delete a route, click the red x (
 ) to the right of the route.
